Duo Ventures

Thursday, December 20, 2012

How to Install: IKEA ALANG Ceiling Lamp


We get a lot of traffic to our blog through the search inquiry: 'how to install IKEA ALANG'.  Interestingly enough, we had some questions ourselves when we installed the larger 18" version in our laundry room several months ago.  We were about to install two of the smaller 14" ALANG lights in our upstairs hallway, & figured it would be a good opportunity to create a photo tutorial.

If you've ever put anything together from IKEA you'll know all about their lovely pictorial instructions that they include.  You may (or may not) find them easy to follow.  Hopefully the IKEA instructions, coupled with this post should get the job done!

First, make sure you have all of the pieces:
Of course, you also want to make sure the light switch & breaker are turned off before you begin.  

Unscrew the old fixture from the ceiling plate (don't lose those screws).  
You will be left with three wires typically- we had 1 copper, 1 white, & 1 black:

Once you have all the components out, you can begin to put the ALANG light together.
Start by fitting the sockets into the white plastic fixture:

Secure the white wires into the slots provided.  We had to push fairly hard to get them to stay in place:

Next, attach the 3 magnetic pieces into the slots: 

Now you need to string the white wire through the metal plate (metal hook facing down & green/yellow wire up).  We forgot to take a photo at this point, but these IKEA instructions illustrate that step:

Next, you need to connect the correct wires together.  
The IKEA directions illustrate the fixture having 1 black, 1 white, & 1 striped wire:

However, the actual fixture has 2 white wires - not 1 black & 1 white.  We knew that the striped wire represented the green/yellow wire & should be connected to our copper wire (ground wire).  However, we weren't sure if the 2 white wires were different from one another.  Why would IKEA show 1 black & 1 white wire if they were the same thing?  Did this confuse anyone else also?

So we did a little research (AKA-call dad & search Google) & this is what we came up with:
Apparently, if the manufacturer provides a fixture with 2 white wires then it shouldn't matter which wire goes where.  It seems that the way the electricity flows (polarity) does not matter in this type of fixture.  As long as the ground wires (copper & green) are connected together you should be good to go.

[Clearly, we are not electricians- just homeowners trying to DIY.  If you are unsure about your electrical situation at home and/or it looks totally different than our set-up, you should definitely consult a professional.]

Next, secure all the twist on wire connectors tightly:

Then gently shove all the wires back into the electrical box & screw the metal plate back on with your existing screws: 

 After the plate is secure, hang the plastic zip tie from the metal hook.  Make sure the side with the ridges is facing the correct way: 

Now you can go ahead & slide the zip tie through the opening on the white plastic fixture: 

Next, run the round plastic piece up the zip tie & flush to the white piece to secure it:

Tuck the end of the zip tie into the slot & add two light bulbs.  
At this point, you should also test the light out before you put the shade on:

To finish, simply line up the 3 magnetic spots on the shade to the 3 magnetic pieces on the fixture....
and voila!

Here's a little Before & After action:
So much better!

 If you'd like to see the larger 18" version we installed in our laundry room click here.
Hopefully, if you had similar questions as we did, you will find this post helpful.
If you have any questions, please let us know!

Mel & Nader
:)

Wednesday, December 19, 2012

Master Bedroom: Window Panels

We have been wanting to get some window panels for our master for awhile now.  The sun rises right in front of our bedroom windows & we get a blast of sunlight very early in the morning.  Now, don't get us wrong, we really love the wake up call- most of the time.  However, there are definitely days when we would prefer darkness a little longer...

So wouldn't you know it, when we finally found some panels we liked- they were sheer.  Turns out that we really like them & don't mind the transparency.  

Here's what we originally started with & what it currently looks like:

The window panels are from Target & are part of the Nate Berkus line.  The style is called Heathered Herringbone & the color is 'lunar'.  It's a really pretty gray-taupe color with a very subtle herringbone pattern (they look purplish in these photos, but definitely not in person).  For some reason, they don't show the color 'lunar' online- but that's what the label said.  The curtain rods are from Home Goods & the drapery rings are from Target:

The panels do have a rod pocket sewn in, but we prefer the look of drapery rings more (& it helps add a few inches to the overall height, so that we can install the rods higher):

We ended up hanging the curtain rods about 6" above the top of the windows & about 7" out from the sides of the windows.  The spot where we wanted to install the brackets didn't fall on any studs, so we used wall anchors to mount the hardware:


So glad it's done!  One more thing to check off our to-do list, even if it wasn't what we originally planned for.

Mel & Nader
:)

Tuesday, December 18, 2012

Organizing: The Coat Closet

As you may know, we have taken on the task of purging & organizing every room & closet in our house.  Yes, every space (go big or go home, right?).  So far we have finished with the kitchen, the linen closet, & more recently, the pantry.  As part of the pantry organization process, we removed all the non-food items that we had originally been storing in there.  Those items included light bulbs, cleaning supplies, paper towels, plastic cups & flatware, portable cooler, plastic bags, & so on.  

Our goal was to find another home for all of that stuff & the best option: the downstairs coat closet.  In addition to the items from the pantry, we had to fit coats/jackets, scarves, hats, gloves, a vacuum, TV trays, extension cords, kleenex, TP, & a drawer storage unit in there.  Um, yea.  A lot of miscellaneous stuff.

Here are the key points of this project: 
  • painted
  • installed three adjustable shelves
  • added baskets & bins for storage
  • created a gift wrapping station

Here's a shot of what the closet looked like when we started- 
the closet is fairly deep & there's a lot of wasted wall space:

First we had to clean, purge, & empty out all the items in the closet:

After we cleared everything out we painted with some leftover living room paint (Wheat Bread-Behr) to get rid of all the scuff marks & scratches on the walls (it may seem weird to paint a closet, but it makes all the difference.  Plus, our closet walls were especially grosssss):

We decided that to best utilize the space, we would need to install shelving on the right wall.  After locating the wall studs, we installed 3 adjustable shelves from Home Depot:

 We had to make sure that the TV trays would fit underneath the bottom shelf 
& that the vacuum could fit on the right side of the shelves:

The closet is 3'2" wide, so even after adding 12" wide shelves, we still had plenty of room to walk around.  Here it is after all of the shelves have been installed: 

At this point, we began putting some things back into the closet.  We got rid of all the mismatched hangers, & instead, hung all our coats using some extra wooden hangers we had leftover from our Laundry Room Makeover (part of Mel's OCD- hangers have to be uniform in size & color):

We added an over-the-door shoe organizer to hold cleaning supplies 
& free up some space under our sink:

 On the left wall we have some hooks where we store more cleaning supplies.   The Swiffer sweeper & mop wouldn't fit on the hooks, so Mel added 
some thick rubber bands (we were out of zip ties):

Usually, we get all our baskets from Garden Ridge because they have a huge selection of sizes, shapes, materials, & colors.  This time, however, we couldn't find the right size we needed for the new shelves.  So instead, we picked up eight fabric bins from Target that were on sale.  All the bins are labeled with some Martha Stewart Name Badges from Staples:

While we were at Garden Ridge, we were able to find three baskets that fit perfectly under the angled wall.  We keep all our winter accessories (scarves, gloves, & hats) here:

We also had to find a central space to store all of our gift wrap & supplies.  We had an extra storage unit laying around, so Mel turned it into a portable gift wrapping station (more on that here).  Most of the wrapping paper is stored on the top shelf inside a clear box from the Container Store:

Before & After:
Hope you enjoyed a little organization action!  
Four spaces down & only a million more to go...

Mel & Nader

Our thoughts are with all those affected by the tragedy in Connecticut

Thursday, December 13, 2012

Neutral & Modern Holiday Decor


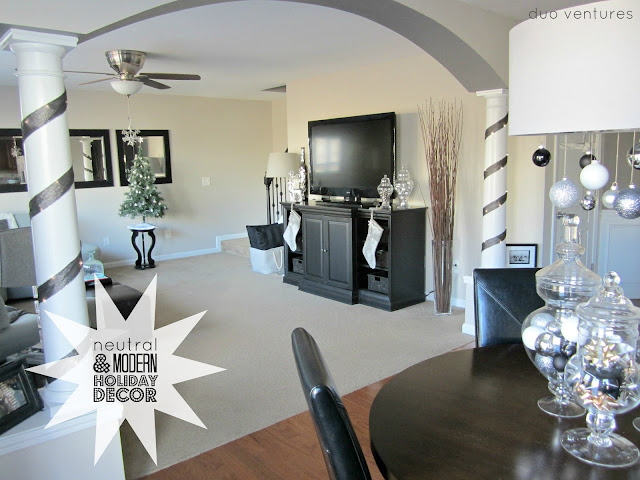
Last weekend we hosted a little holiday gathering with some of our co-workers, so we had to pull out the decorations, turn on the music, & bring out our inner "Elf"...(everyone does that, right?)

While we love all the classic holiday decor, we are definitely more non-conventional kind of people.  For some reason, we don't gravitate towards any of those traditional primary reds & greens.  Maybe because our color schemes are so gray & neutral throughout our house?  Or maybe because we like putting our own modern spin on it?  Either way, we like to keep all of our holiday decor colors & themes neutral.  This year, our holiday colors primarily consist of whites, blacks, grays & silvers.   

Now, let me be the first to admit...I am obsessed with apothecary jars.  I have quite a few of them throughout our house, & the dining table is no exception.  They are normally filled with lemons, but for the holidays we filled them with ornaments, metal cookie cutters, & bows:

The ornaments are in all different finishes- pearly, sparkly, shiny, & matte.

We also strung some ornaments from fishing line & hung them below the light fixture at different levels.  Nader used paper clips to attach the string to the actual fixture:

We found some of these bendable crystal holiday decorations (who knows what they're called) from Target & we wrapped them up the light fixture:

We have two more apothecary jars on the right side of our TV stand, which we filled with silver bells (from Hobby Lobby) & more silver ornaments:

On the left side of the TV, we just added some deer from Home Goods:

 We hung two stockings from our TV stand as well:

For the columns, we bought some mini battery operated LED lights from Target & some dark taupe/gray ribbon from Home Goods.  We strung up the lights & secured them with tape, then just wrapped the ribbon over the lights:

 We "wrapped' our doors with two pieces of silver ribbon & a bow (we used a regular sized bow, but it would look better with one of those giant ones):

This year we decided not to have a big tree.  Luckily, we had our mini tree already decorated (we kept it in the guest room since last December...haha).  Smaller artificial trees are awesome if you don't have the time, money, or patience to decorate a big tree.  We set the tree up on a side table:
So there's a little neutral holiday inspiration for ya!  We still have a few more things to put out, but this is what we've got so far...Hope you liked it!

Happy Holidays Everyone!

Mel & Nader
:)