Duo Ventures

Saturday, December 21, 2013

Holiday Decor 2013

So here's our casa for 2013!
It's very similar to last year - very neutral & modern with a lot of silver, gold, & metallic finishes:

We hung some glass bulbs from the chandelier again this year.  We also added some metallic candles to our collection of glass & crystal candle holders:


We haven't had a normal size tree since our first year in the house - back in 2008.  That year we bought a real tree.  Sometime in January, Nader decided to dispose of the tree by placing the tree in it's plastic tree stand in our backyard & lighting it on fire.  True story.  Who does that?!

While we like real trees, we decided to shop around for a fake tree this time around (we didn't want Nader burning down the house this time).  We were looking for a pre-lit tree that was between 7' & 7.5' tall (our ceilings our 8').  We checked out Garden Ridge, Home Depot, Target, & Hobby Lobby.  Wouldn't you know it, the trees we liked best were always $200+.

By the end of the day we were so sick of shopping that we just decided to grab a tree from Target & be done with it - you know the feeling?  So we ended up with the pre-lit 7' Alberta Spruce tree with 300 lights.

Once we got it home & set it up, we realized we were not in love with the shape.  We were hoping for something....more full?  Maybe we can score a more realistic tree on clearance after the holidays are over.  Anyways, here it is all decorated:


The ornaments are a mix of textures, colors, & shapes.  We stuck with mostly white, silver, black, taupe, & clear glass ornaments.  Most of the glass bulbs are from Hobby Lobby.  
These white snowball looking bulbs are from World Market & the glass icicles are from Target:

The glass acorns & silver textured bulbs are from World Market:

We found these mittens @ Home Goods:

We also found our tree skirt @ Home Goods.
 It has a cable knit sweater texture & 3 little wooden toggle buttons:


We thought this silver frame with a sweater texture was perfect for the holidays too:

We turned a couple of doors into presents by adding some silver ribbon & giant bows.  We did this last year also, but we didn't have the over-sized bows.  It looks so much better & more proportional with the giant bows.  We wrapped mini LED lights around the columns & covered them with some ribbon:

Next to the columns we added a trio of round stacking boxes from IKEA.
On the right side, we set out a large apothecary jar filled with some glass bulbs
(we did this last year also, except we had it on our dining table instead):

Our media cabinet is set up similar to what we had last year, with a couple of exceptions.
We got new stockings from Kohl's (since they were 50% off):

Unfortunately, we don't have a fireplace - so we pretend thanks to the On Demand Yule Log:


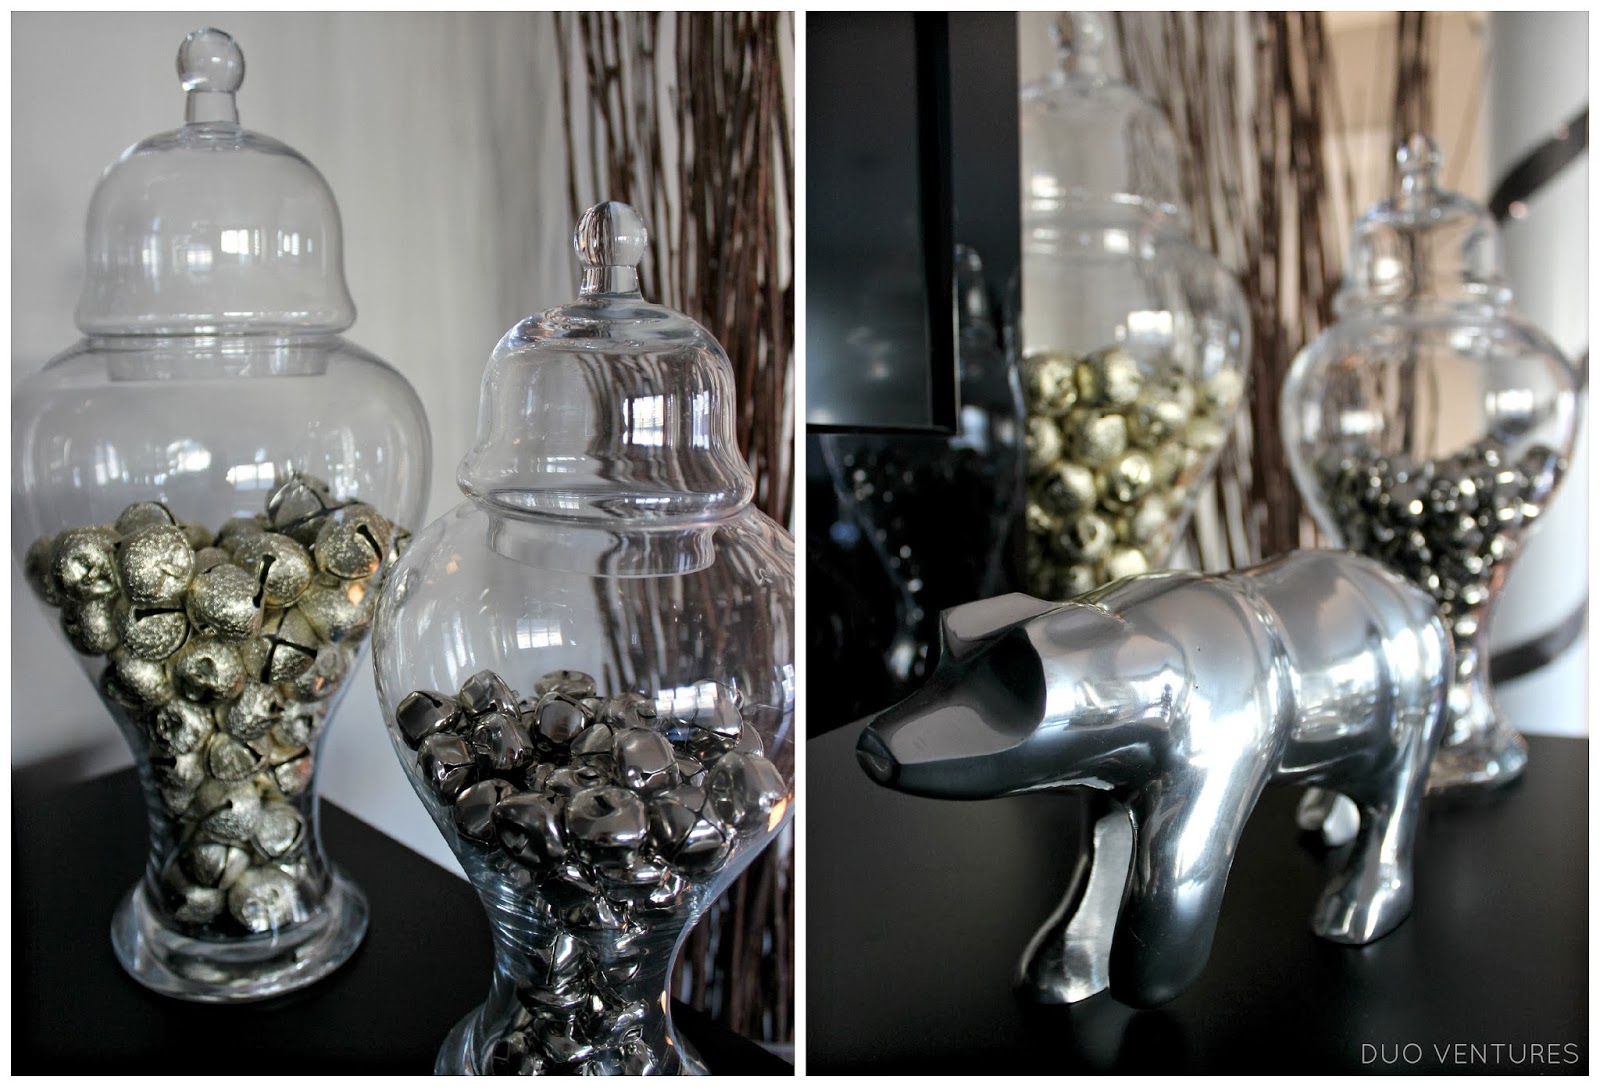
We also added some gold bells in the larger apothecary jar (last year we had silver bulbs instead):

The other new addition is the silver polar bear from Home Goods:

In the kitchen, we added a pair of nutcrackers & stuck a bottle of wine in this sweater bottle cover:

We also put some bows & cookie cutters in a pair of apothecary jars:

In the front office we went crazy decorating.  We added a trio of nutcrackers (over the top, right?):


In the foyer we added a couple of metal deer - one brass & one silver:


In the half bath, we took the feathers out of the frames & replaced them with festive scrapbook paper:

That's it!  Hope you liked our home tour for 2013!
Happy Holidays!

Mel & Nader
:)

Wednesday, December 4, 2013

DIY: Studded Lacquer Tray

I have finally finished my studded lacquer tray!  It only took me a year  ;)

In January, I purchased a rectangular gold tray from Target that was in the Holiday clearance section for $7.48:


It sat in our garage for forever (shocker), until I finally decided to do something with it the other day.  First, I spray painted it white:


As I let the tray dry, I started thinking about what I would do to customize it.
While I was Pinterest browsing, I saw a lot of trays with thumbtacks or nail-head trim.
I'm a sucker for anything with nail-head detail, so I decided to go that route.


While I could have easily gone to Joann's & picked up some nail-head trim, it was even easier for me to go to Target & get some thumbtacks instead (I also figured it would be the cheaper route too).  For some reason I thought the thumbtacks could be easily pushed or nailed into the tray...

Fail.  The wood tray was just too tough for those little thumbtacks - they kept bending & scratching the paint.  I don't have a photo of my first attempt failure, but it's pretty self explanatory.  I also thought about cutting off the sharp tack portion & then just gluing the thumbtacks on - but then decided that was just way too much work.  Back to the drawing board...


I took a trip to Michael's & spent like 30 hours in their bead & jewelry aisles looking for a solution.  Finally, I found a box of plastic gems with all sorts of different shapes:


I actually preferred the gems multifaceted look over the more simple thumbtacks
& there were so many shapes to choose from.  First, I organized the gems by shape & transferred them all to plastic bags (because I'm OCD like that):

After playing around a bit, I narrowed it down to the small circular gem & the large square.  Since I still hadn't decided on a shape, I spray painted my two favorite shapes gold:


Once they were all dry, I played around with some different designs.  If you follow us on Instagram you might have seen the final two options:

I decided to go with the round studs in the pattern shown above.  Next, I got all my supplies ready - which included the tray, the gold studs, some Krazy glue, & a glue gun:

I did a dry run first to make sure all the spacing would work out evenly.  Luckily, the dimensions of the tray & the size of the studs worked out almost perfectly - so I didn't have to worry about any weird spacing issues.  I cut out a strip of note card & used that as my spacing guide between the studs:

Then I glued them on one by one.  I suppose you could use most any kind of glue to attach them.  However, I did find the hot glue to be a little more forgiving in that I could pry them off without the paint chipping off (in the event that I didn't place a stud correctly the first time).

After they were all glued on, I tested all the studs to make sure that they were all securely attached.  A couple of studs did pop off when I pushed on them - so I used the Krazy glue to reattach them.  Overall though, the hot glue seemed to work for most of the studs.

Next, I sealed the tray with some spray lacquer.  I ended up spraying it several times - around 8-10 coats.  I was going for a super shiny lacquered finish.  Rustoleum also suggests that you can sand the lacquer & re-coat for an even higher-gloss finish:

It's hard to see the finish in most of the photos, but you can see the difference the lacquer made in this side by side comparison:


While the tray cured, I went to my favorite place on earth (Home Goods).  I found some white & gold zebra print wrapping paper to line the tray with:

To size the paper, I took some newspaper & cut out a template.  Here it is after the new liner:

And here's the tray on our ottoman in the living room:

The magnifying glass & white faux antler were some of my finds from Home Goods.
I looove the magnifying glass (check out how I made the beveled mirror vase here):


Now that the tray is done, I'm working on another small project to store & organize business cards - inspired by a little DIY from IHeart Organizing.  Hopefully this one won't take me a year to finish...   ;)

xoxo,
Mel